Dilemma with a Kodak Specialist 2

lharby

Popular Poster
Registered User
Joined
Sep 5, 2021
Messages
104
Hello all.

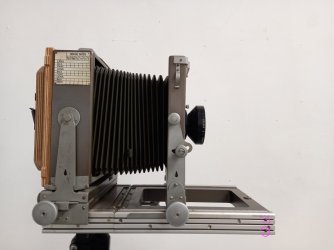
I am currently a bit miffed. I have a lovely Kodak Specialist 2 I bought a while back. Not long ago got some film holders for a very good price, as well as some b/w film. Also recently came into two new lenses and have lens boards which will fit onto this camera.

Was hoping to actually work on a project at the end of May with this set up.

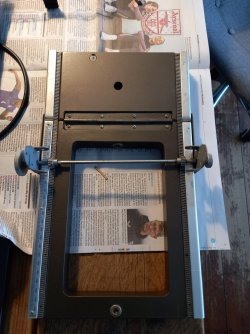
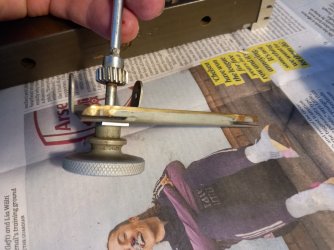
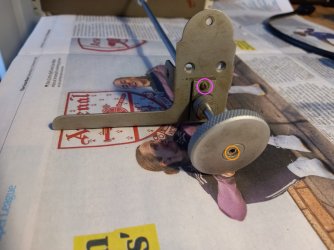
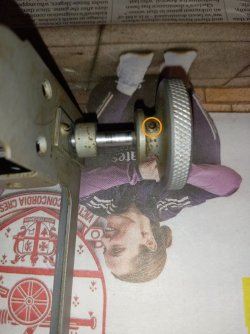
The problem I'm having: The gear/screw mechanism on the front bellows is disastrous, it's never been great, but it seems to be getting worse. I think the main pinion is all mangled up.

My dilemma, do I:

- Try and take everything apart, clean it myself and/or see if I can source a new pinion/screw.
- Take it someone else who can hopefully do this for me and do a much better job (although I have no idea who this might be)
- Cut my losses and either invest in a replacement unit, or find an alternative 5x7 system.

I really don't want to do option 1, I am not great with this kind of thing.

Can you even get pinions? I do recall getting some replacement screws for this and they were M5 much to my surprise (was expecting a camera of this date to be imperial).

Any help/advice much appreciated.
 
I just had a look at my Specialist 2. I would try removing everything front & back standards from the focus bed and inspecting. I noticed that the front standard focus on mine is very stiff.

The Press stud at the font is screwed in, so you could remove that and just the front standard, I checked with a screwdriver. At the same time, I ran a screwdriver tip into a couple of teeth of the racks and removed lumps of gunk, which was compacted and hard. That's obviously the issue with mine. There was a point where it was almost stuck.

The racks are aluminium and I think would damage first, not the pinions, I will go back to the darkroom with a tooth brush and IPA and see what a difference it makes.

Ian
 
Thanks Ian.

I might have a go at that when I get the chance.
 
I have just finished cleaning and re-assembling. I took the rear standard off first then the front, then cleanede the racks, I also cleaned the slots on the sides of the trackbed. I lubricated lightly.

The front sndard is still stiffer to focus than the rear, but I think this is largely due to the trailing guides that stabilise the standard running in the side slots. Definitely better.

Ian
 
I am not even sure how the standards come off. If you loosen the screws will the pinion come away from the track? Otherwise I noticed a screw along the end of the track, which would normally stop the standard moving beyond it. I guess you can remove that and roll them off the end of the track? My worry is that unless it can be loosened first, the standard won't move along the tracks at all.

I'm wondering if I need some photos. I did try looking online to see if anyone else had gone through the same routine.

I've circled the two little locking screws at the front of the rail.
 

Attachments

  • kodak-specialist-2-a.jpg
    kodak-specialist-2-a.jpg
    83.5 KB · Views: 18
1744035971252.png

I just taped the safety catch at the rear open (flat) and wound both standards off the rear. This catch was added to later versions, earlier don't have anything.

Later I did take the front standard off the front by taking the top screw you circled out and removing the press stud. Either way is very easy,

Ian
 
Last edited:
Thanks so much Ian, I really appreciate this.
 
OK

I think I know the issue but I definitely don't know how to solve it.

The problem is the guides that sit along the outside grooves that are driven by the pinions. They are stiff even when the whole thing is apart.

Both left and right have a slight bow in the them (I think this is by design to help them hug the groove and not slide about). kodak-guide-1.jpg

The left one comes off completely. but the right one is attached. And you can see where it is worn (kodak-guide-2.jpg)

There was a screw missing below the pink circle in kodak-guide-3.jpg I sacrificed one from the other guide, but it made no difference. I can't unscrew the entire gear thing to get the plate off, although the orange circle looks like an alan key fitting (none of mine fitted, but it's pretty worn).

There is an alan key recessed screw on the inside of the last picture kodak-guide-4.jpg I took it out but it didn't seem to do anything.

I've used rubbing alcohol to give everything a spruce up, cleaned the grooves as best I could (gunky, but no obstructions).

My questions

- Should the guides and grooves be oiled/greased.
- If I take it to someone who can snap the guides off, will I be any worse off? I imagine the thing planing around a bit more, but it might be preferable to what I have now.
- Is there something else I could fashion to use as the guides even if a bit shonky.

I guess the key is knowing if I can dismantle the pinion gear with the right hand side guide on it.
 

Attachments

  • kodak-pinions-1.jpg
    kodak-pinions-1.jpg
    153.3 KB · Views: 12
  • kodak-guide-1.jpg
    kodak-guide-1.jpg
    115.2 KB · Views: 11
  • kodak-guide-2.jpg
    kodak-guide-2.jpg
    152.6 KB · Views: 12
  • kodak-guide-3.jpg
    kodak-guide-3.jpg
    125.4 KB · Views: 11
  • kodak-guide-4.jpg
    kodak-guide-4.jpg
    149 KB · Views: 11
I have just finished cleaning and re-assembling. I took the rear standard off first then the front, then cleanede the racks, I also cleaned the slots on the sides of the trackbed. I lubricated lightly.

The front sndard is still stiffer to focus than the rear, but I think this is largely due to the trailing guides that stabilise the standard running in the side slots. Definitely better.

Ian

Ok I just re-read this, it sounds like the same issue is my, but maybe mine is too far gone!

What did you use to lubricate with?
 
There’s one thing to watch out for is when putting the standard back. It’s relatively easy to engage the rack and pinion on teeth that are not quite opposite each other, so it’s very slightly out of square. This will make the system feel stiffer, but it will almost certainly move. Easy to correct. Just wind it off and replace correctly.
 
For what it's worth, I think you're doing a great job, bravo!

And it looks like all of the teeth are in good condition on both the rollers and beds. No serious wear or damage.

So, if I were you, take the tlc approach;
Strip it, as far as you can.
Clean it, the best you can.
Lubricate it, lightly.
And put it all back together again testing and taking care as you go along to notice any resistance and pinch points.

And as DavidM points out, check repeatedly for any wayward or alignment issues during re-assembly.

Fingers crossed!
 
Ok I just re-read this, it sounds like the same issue is my, but maybe mine is too far gone!

What did you use to lubricate with?

I used some 3 in 1 oil, but if I remember, I will ask an engineer friend tomorrow evening if there's something better. You can spot as soon as you start if the standards aren't engaged squarely with the focus track-bed. I found it very easy to align correctly.

I think it's a slight design flaw. Older Kodak Ltd and Eastman Kodak models (2D etc) didn't run in Aluminium edges, but the slots in wood wore heavily.

In use these cameras were really designed to use the front standard to set up for a focal length lens and then rear focussing in use. If you look at traditional British tail board cameras, the front standard is fixed, at the front. It's the same with most Reiskameras and French Chmabre de Voyage cameras.

With close up work rear focussing is preferable and the Specialist 2 was sold for many uses but particularly Police. Forensic, Medical, Dental, and Scientific uses and the standard lens was always the 203mm f7.7 Ektar which is a Dialyte and gives superb performance from Infinity to 1:1, so excellent for close up work.

Personally, while I'm used to 5x4 cameras with no rear focus, I much prefer rear focussing with larger formats, particularly for portraits etc,

Ian
 
Be careful to wipe off all visible trace of surplus oil. The last place you need to pick up oily fingerprints is a large format camera.

Ian is quite right. The closer you are to the subject, the more desirable rear focus becomes. For many uses, like police identity photographs, the camera would have been focussed only once and then used repeatedly at that setting.
 
I used some 3 in 1 oil,
Once described as the clockrepairers best friend..its dreadful stuff (eventually gums up) Ok for bikes!!
...Best to use proper instrument oil.....
 
Something more like WD-40, perhaps. Really, a well-made camera should need no more lubrication than a chest of drawers.
 
Something more like WD-40, perhaps. Really, a well-made camera should need no more lubrication than a chest of drawers.

I am generally disinclined to use WD-40 anywhere near photographic instruments. It is a water displacement formula (hence the name) and suffers in that it leaves a dreadful residue behind.

As suggested upthread, the best we might do here is a complete and thorough cleaning - I like naptha for that purpose followed by a rubbing alcohol wipe down - and then very light lubrication - Silicone grease for the rotating surfaces racks/pinions, and a minimal application of machine oil to the flat surfaces/grooves.
 
WD-40 - well the original -- is the last thing you should use, except for feeing up locked items,

These days WD-40 is a trade name used for a variety of products including Silicone lubricant, Contact cleaner, Rust remover. I have used the original on vintage leaf shutters, however ensuring all traces are removed before final re-assembly.

Ian
 
I didn’t know that. I still have my original faithful can.
 
Back
Top